BT Infinity – BT’s implementation of Fibre-To-The-Cabinet (FTTC) is great, especially when you compare it to standard broadband. Sadly the same cannot be said for their provided router (the HomeHub) which is useless, and happens to use your bandwidth to provide a publicly accessible hotspot for any pleb to come along and use. This guide will talk you through setting up a Cisco router to take the place of the HomeHub and teach you how to avoid some of the pitfalls that may otherwise blight your installation.
First of all, you need to understand the hardware you have and what you will be replacing it with. BT will supply and install you both a modem which is a small white box that connects to the VDSL outlet of your telephone point, and the HomeHub which is your wireless router; as shown in the photos below.


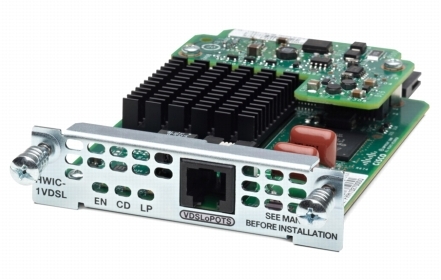
It is possible to replace both the modem and the router with Cisco hardware by purchasing a Cisco HWIC-1VDSL card. However this presents two problems, first, you run the risk of them not playing nice with BT’s network and breaching BT’s ToS which seem to suggest that you may not replace their modem. Some people have however managed to do this, although the cost is prohibitive; a HWIC-1VDSL I found on eBay (See below) was about £300 for the card alone. Finally the use of this card restricts you to the Cisco x900 series routers which are massively expensive to buy, and even more so if you want the advanced feature sets.
The setup for this discussion is a Cisco 1921 router with 2 onboard Gigabit Ethernet ports and a Cisco 1252 b/g/n Aironet. The physical and topological configurations are shown in the following diagram. The VDSL line from BT’s DSLAM terminates into the DSL port of the modem. An Ethernet cable then runs from the LAN1 port of the modem to the first gigabit Ethernet port of the router. A second cable then runs from the second gigabit Ethernet port on the router to the Ethernet port of the access point.
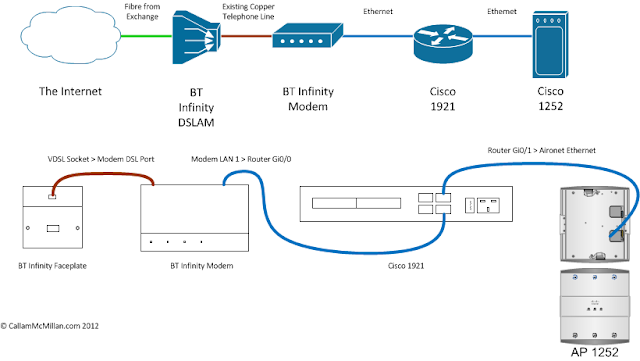
When this is all wired into place, it should look something like this:


You’ll notice that the whole setup sits on the shelf of a small coffee table just inside the front door of the house where it is situated. The reason for this (rather than it being neatly installed in a cupboard somewhere) is that there is a problem with the Infinity system that BT fail to explain in their advertising. In a traditional ADSL setup, your drop cable from your telecoms provider terminates at the NTE5 box (The master socket) somewhere in your house – usually a living room or hallway, but from here you can then run extension cables to slave points throughout the property. With BT Infinity you can’t do this since the NTE5 faceplate is replaced by a VDSL faceplate which can’t be extended via the building wiring. The alternative, as was the case with the previous Cisco installation job (Link) is to run the connection between the modem and the router via Ethernet. If however you want to keep all your equipment in the same place, then the best thing to do would be to extend the drop cable to your comms rack and terminate it into a NTE5 there so that when BT perform the installation, everything is in place in the rack.
Now that the hardware is in place, the router and wireless access point need to be configured. The first pitfall that you may encounter is if you attempt to establish a connection using a standard Ethernet configuration on your WAN port; in this case your router will simply fail to connect since unlike the Virgin Media modem which handles the authentication, the BT modem does not, you have to do this this via PPPoE. The second pitfall is much trickier to diagnose and resolve. Once you think you have successfully configured everything, you’ll be able to get online… But only to some things – Google will work for instance, as will Skype, but most websites will not. The reason for this is that packets are being returned out of sequence and are being dropped, causing connections to fail. The solution to this problem is careful adjustments of the MTUs on the interfaces.
We’ll begin by configuring the 1921. As always, it is important to remember that this is not a full production-class configuration, rather it is a guide which will give internet connectivity and can be refined further. From the console, enter the terminal configuration mode:
First we want to encrypt the stored passwords which cannot be hashed; also, we’ll enable tcp-keepalives in order to improve the reliability of remote connections; finally we’ll set the routers hostname To do this, we want to issue the following commands:
service password-encryption
service tcp-keepalives-in
service tcp-keepalives-outhostname internet_router
Next we need to set up our IP address space, DHCP pool and name servers; we’ll also give the router a domain name at this stage. To do this we want to exclude the IP address of the router and the access points using the “ip dhcp excluded-address” command. The dhcp pool needs to be given a name, an address space, the default gateway and the IP addresses of the DNS servers that will be issued to clients. In this case we’ll use one of BT’s servers and the Google DNS server. The domain name is set using “ip domain name” and the routers name servers set using “ip name-server”. Name servers are not strictly necessary, but allow DNS lookups to take place from the router. The commands now look something like this:
ip dchp excluded-address 192.168.1.1 192.168.1.2
ip dhcp pool main_dhcp_pool
network 192.168.1.0 255.255.255.0
default-router 192.168.1.1
dns-server 194.74.65.68 8.8.8.8
exitip domain name testnet
ip name-server 194.76.65.68
ip name-server 8.8.8.8
This configuration is intended to have a reasonable degree of security, so we’ll set up user accounts and SSH access at this stage. to create a administrative user account the syntax is “username [username] privilege 15 secret [password]”. Looking at the configuration as it is saved, the password component of the user account will now be stored as a MD5 hash. The command to enable SSH is “crypto key generate rsa” and then follow the on screen prompts. This article contains more information on the process of enabling SSH (Link). Finally we’ll restrict SSH to clients using version 2 only since SSH1 is considered broken, we do with “ip ssh version 2”.
crypto key generate rsa
… [specify key strength]
ip ssh version 2
The final non-connectivity-related stage is to configure the access parameters. We do this by configuring the access lines to the router. We have three modes of access: Console, Aux, and vty lines. For each of these we will issue the “login local” command meaning the user must log in, the “logging synchronous” command which stops console messages interrupting user input. For the vty lines we want to also issue the “transport input ssh” which means that the use can only log in remotely via SSH and not using telnet which is insecure. It is worth noting that this router has 1371 vty lines (0-1370), the router will convert these to two blocks of lines (0-4 and 5-1370) since the first block is to preserve compatability with older routers. The config will resemble the following:
line con 0
logging synchronous
login local
exitline aux 0
logging synchronous
login local
exitline vty 0 1370
logging synchronous
login local
transport input ssh
exit
Now we move onto the core component of the router, setting up the interfaces, access lists and routing. We’ll begin by setting up the WAN port that connects to the modem. The configuration for this is very simple, but there are two big things which can trip you up if you’re not careful. The first is that unlike with Virgin Media, the modem does not handle the network authentication, this is left to the router and is done via PPPoE. The second issue which is much less discussed and is much harder to diagnose is that if the MTU (Packet size) values are not adjusted then the connection will be virtually unusable. Beginning with the basics, the interface requires no IP address, automatic speed and duplex settings and a packet size of 1452. Finally, we need to enable PPPoE using the global group and Dialer Pool 1; this is all done with the following commands:
int gi0/0
no ip address
speed auto
duplex autoip tcp adjust-mss 1452
pppoe enable group global
pppoe-client dial-pool-number 1
exit
We also need to configure the LAN interface which requires a fixed IP, NAT and a modified packet size; we’ll also enable virtual-reassembly inbound with the following commands:
int gi0/1
ip address 192.168.1.1 255.255.255.0ip nat inside
ip virtual-reassembly in
ip tcp adjust-mss 1350duplex auto
speed auto
exit
While the router can now talk to upstream and downstream devices, it will be unable to authenticate, get a WAN IP address or do any of the other things needed to establish a connection. Therefore what we need to do is set up a psuedo-interface called Dialer1 which handles setting up a WAN connection. We want the connection to negotiate an IP address, be on the outside of the NAT and use an inbound ACL. We also need to adjust the MTU to 1492 and provide authentication details. For the authentication we will supply details for both CHAP and PAP, although you may be able to avoid using PAP. The commands are as follows:
interface dialer1
ip address negotiatedip access-group 101 in
no ip unreachables
ip mtu 1492
ip nat outside
ip virtual-reassembly in
no cdp enableencapsulation ppp
dialer pool 1ppp chap hostname bthomehub@btbroadband.com
ppp chap password 0 bthomehub@btbroadband.com
ppp pap sent-username bthomehub@btbroadband.com password 0 bthomehub@btbroadband.comexit
This is everything the router needs to make a connection to the internet. All that is now left to do is allow traffic to flow and make the various interfaces talk to each other. Let’s start with NAT, which needs both a command to enable it, and an access list to control what goes where. We want to tell the router to NAT traffic to the inside interface from the Dialer interface according to ACL #1. The overload parameter at the end of the NAT command is important since this allows multiple LAN connections to share the internet. Forget this and you won’t be able to use the internet. This is done with the following commands:
ip nat inside source list 1 interface Dialer1 overload
access-list 1 remark INTERNET-ACCESS
access-list 1 permit 192.168.1.0 0.0.0.255
Now we want to secure the connection so that people can’t just waltz into the network from the internet and start snooping around. This is what the inbound ACL is designed to prevent. First of all we’ll deny the reserved private-address spaces and two hosts which will never be seen in the wild 0.0.0.0 and 255.255.255.255. We also want to block the UDP port range 33400 to 34400 in order to stop traceroute working beyond the network edge. Next, we want to permit some ICMP packets in that allow us to understand what is happening with the traffic, but not enough to allow attackers to exploit the network. We want to enable the ICMP services net-unreachable, host-unreachable, port-unreachable, packet-too-big, administratively-prohibited, source-quench, ttl-exceeded, and echo-reply. Finally we want to allow established TCP and UDP communications, leaving everything else not specifically allowed in the denied state. The ACL therefore looks like this:
access-list 101 deny ip 192.168.0.0 0.0.255.255 any
access-list 101 deny ip 172.16.0.0 0.15.255.255 any
access-list 101 deny ip 10.0.0.0 0.255.255.255 any
access-list 101 deny ip 127.0.0.0 0.255.255.255 any
access-list 101 deny ip 255.0.0.0 0.255.255.255 any
access-list 101 deny ip 224.0.0.0 7.255.255.255 any
access-list 101 deny ip host 0.0.0.0 any
access-list 101 deny ip host 255.255.255.255 any
access-list 101 deny udp any any range 33400 34400
access-list 101 permit icmp any any net-unreachable
access-list 101 permit icmp any any host-unreachable
access-list 101 permit icmp any any port-unreachable
access-list 101 permit icmp any any packet-too-big
access-list 101 permit icmp any any administratively-prohibited
access-list 101 permit icmp any any source-quench
access-list 101 permit icmp any any ttl-exceeded access-list 101 permit icmp any any echo-reply
access-list 101 permit tcp any any established
access-list 101 permit udp any any
The very last step is to set a couple of static routes to make the Router Route! Since the network is so simple, there is little point in applying a routing protocol, so two static routes, one for each interface is fine:
ip route 0.0.0.0 0.0.0.0 Dialer1
ip route 192.168.1.0 255.255.255.0 gi0/1
As for the configuration of the wireless access point, this is a topic for another day. As such what is included below is a config that works, although I make no guarantees as to how secure, reliable or efficient it is:
no service pad
service timestamps debug datetime msec
service timestamps log datetime msec
service password-encryptionhostname xxxxxxxxxxxxxxxx
no logging console
enable secret 5 xxxxxxxxxxxxxxxxxxxxxxxno aaa new-model
ip domain name xxxxxxxxip ssh version 2
login block-for 600 attempts 5 within 60
login delay 1
login on-failure log every 10
login on-success logdot11 ssid xxxxxxxxxxx
authentication open
authentication key-management wpa version 2
guest-mode
wpa-psk ascii 7 xxxxxxxxxxxxxxxxx
!
dot11 ssid xxxxxxxxxxx
authentication open
authentication key-management wpa version 2
guest-mode
wpa-psk ascii 7 xxxxxxxxxxxxxxxxxpower inline negotiation prestandard source
crypto pki trustpoint TP-self-signed-68175988
enrollment selfsigned
subject-name cn=IOS-Self-Signed-Certificate-68175988
revocation-check none
rsakeypair TP-self-signed-68175988crypto pki certificate chain TP-self-signed-68175988
certificate self-signed 01
xxxxxxxxxxxxxxxxxxxxxxx
quitusername xxxxxxxxxxx privilege 15 secret 5 xxxxxxxxxx
bridge irb
interface Dot11Radio0
no ip address
no ip route-cacheencryption mode ciphers aes-ccm
ssid xxxxxxxxxxxx
speed basic-1.0 basic-2.0 basic-5.5 basic-11.0 basic-6.0 basic-9.0 basic-12.0 basic-18.0 basic-24.0 basic-36.0 basic-48.0 basic-54.0 m0. m1. m2. m3. m4. m5. m6. m7. m8. m9. m10. m11. m12. m13. m14. m15.
channel width 40-above
channel 2437
station-role root
bridge-group 1
bridge-group 1 subscriber-loop-control
bridge-group 1 block-unknown-source
no bridge-group 1 source-learning
no bridge-group 1 unicast-flooding
bridge-group 1 spanning-disabledinterface Dot11Radio1
no ip address
no ip route-cacheencryption mode ciphers aes-ccm
ssid xxxxxxxxxxx
no dfs band block
speed basic-6.0 basic-9.0 basic-12.0 basic-18.0 basic-24.0 basic-36.0 basic-48.0 basic-54.0 m0. m1. m2. m3. m4. m5. m6. m7. m8. m9. m10. m11. m12. m13. m14. m15.
channel width 40-above
channel dfs
station-role root
bridge-group 1
bridge-group 1 subscriber-loop-control
bridge-group 1 block-unknown-source
no bridge-group 1 source-learning
no bridge-group 1 unicast-flooding
bridge-group 1 spanning-disabledinterface GigabitEthernet0
no ip address
no ip route-cache
duplex auto
speed auto
bridge-group 1
no bridge-group 1 source-learning
bridge-group 1 spanning-disabledinterface BVI1
ip address 192.168.1.2 255.255.255.0
ip mtu 1350
no ip route-cacheno ip http server
ip http secure-server
ip http help-path http://www.cisco.com/warp/public/779/smbiz/prodconfig/help/eagbridge 1 route ip
line con 0
logging synchronous
login local
transport output sshline vty 0 4
logging synchronous
login local
transport input ssh
transport output sshline vty 5 15
logging synchronous
login local
transport input ssh
transport output ssh

You should be able to do this without any MTU/MSS adjustment and leaving defaults (MTU1500) as the BT modem supports ‘baby jumbos’ as does your 1921. That’s how I have it working.
I’d just like to say thank you ever so much!
You’ve helped me along the way getting my Cisco 1912 setup with my EE fiber line. Been playing around with it for the last few days but this has been a gem of a guide!
Just wanted to say thanks.
Frankie,
Without an MTU/MSS adjustment, internet access was patchy to non-existent. Skype connected fine, as did the Google homepage. If you tried using Google or accessing any other website however, the browser would simply sit there trying to load the page – without success.
Once the MTU/MSS values were adjusted per the guide above, full connectivity was restored.
Thanks for the article. I’m considering a similar set-up. I wondered what speeds you are achieving with this configuration? Do you reach the Infinity line speed?
Yes, this setup allows you to reach your maximum line speeds. I am running a Cisco 3845 at home on a fibre package offering 72/19 and I regularly get this.
I hope this helps
With the correct IOS image on the 2921 you can use the following commands for mini jumbos, allowing you to pass full size packets (I use this config successfully with c1900-universalk9-mz.SPA.153-2.T1):
int gi0/0
no ip tcp adjust-mss 1452
mtu 1508
pppoe-client ppp-max-payload 1500
int gi0/1
no ip tcp adjust-mss 1350
mtu 1500
Thanks for that SGS. I will try it next time I rebuild my configuration. I’m not sure if a few extra bytes per packet will make a huge amount of difference to my connection speed, but it seems a shame to waste bandwidth.
I’ve gone ahead and bought a 1941 to set up something similar to this, so thanks for the guide and the reassurance about the speeds. I’m just planning my deployment now, but one thing is confusing me. What is the best way to, for example, allow access to a host from the outside. I can statically map the port, I believe, but do I also have to add an entry to the inbound ACL (101 in your example)?
I’ve gone ahead and bought a 1941 to set up something similar to this, so thanks for the guide and the reassurance about the speeds. I’m just planning my deployment now, but one thing is confusing me. What is the best way to, for example, allow access to a webserver from the outside. I can statically map the port, I believe, but what to do about the inbound ACL (101 in your example)?
Hi James, I’m glad you’ve found this useful. In answer to your question, if you’re happy with the port forwarding then all you need to do is punch a hole in your ACL from the Internet to your web server on the desired port. Assuming your web server is at 10.20.30.40 and responds on port 80 then the command you want is:
permit tcp any host 10.20.30.40 eq 80
This will allow traffic through to your router so it can forward it to your web server. Hope this helps.
Hi Callam, this post, and your answers, have been a great help. Your suggested configuration
permit tcp any host 10.20.30.40 eq 80
is what I imagined also. However, I’m having trouble understanding how this works.
IP 10.20.30.40 is in the local LAN behind the NAT. I’m wondering if the packet from the Internet that the ACL receives will reference this address, or if it will be addressed to the public IP instead. I’ve a suspicion that the ACL will be checked first, that is before the static NAT is applied, and so this rule won’t match?
James, you are quite correct to be confused because I have just spotted my mistake! The above example only works when the address of the web server is known such as on a WAN. On the Internet you will have at least one public IP address that you wish your web server to respond to. You then need to permit traffic directed at that address.
Your rule would therefore be:
permit TCP any host [public IP] eq 80
Working through the process step by step we have:
1. Traffic arrives at Port 80 of your public IP.
2. As it matches the rule, it is allowed into the router.
3. A NAT rule changes the packets destination to the local address of your web server.
4. Your routing rules then send the packet where it needs to go.
Again, I hope this helps and please reply if you want any more help.
Callam, it is a relief that I wasn’t going completely mad. It is quite an involved configuration as I’m just starting out with Cisco kit. Thanks for the clear explanation.
I did a bunch of research on this yesterday – the problem I have with your suggested rule is that my public IP is dynamic, since BT won’t give residential customers static IPs. So, I would have to change the ACLs every time my IP changes, which isn’t desirable. The advice I found is to simply use an any/any rule ( see comment from Rolande in http://www.dslreports.com/forum/r8421366-access-list-for-interface-with-dynamic-IP- ):
permit TCP any any eq 80
This seems to be “less secure” than specifying the public IP, but as there is only one public IP, and as there then follows a NAT, I believe it should be OK.
It would be interesting to hear your thoughts.
James, that’s an interesting conundrum. Yes, using an any any rule would would work. While technically it would be less secure it shouldn’t actually matter for all practical intents and purposes.
If you are looking for absolute stability then I would consider the above to be good enough. If you like to experiment though, perhaps you should take a look at the following: https://supportforums.cisco.com/document/66011/asa-using-hostnames-dns-access-lists-configuration-steps-caveats-and-troubleshooting – It was intended for the ASA devices, and I don’t know if it will work on IOS.
If you set this up, then you can get yourself a dynamic DNS domain name from someone such as no-ip.org (This isn’t production class, but neither are non-static addresses.) Then you can use your domain name in the ACL.
Of course, a third way, if it possibly applies to you is to look at an alternate ISP. I am using Plusnet’s version of BT infinity which is as fast as BTs, cheaper than BTs, and I got a static IP for them for a one off fee of five pounds. It also allows me to map a domain name back to my private IP.
Great guide!
I have a 2811 Cisco router that I would like to use and I cant get it to work. I dont think its the configuration you have supplied but the setting on the TalkTalk Router.
So I type in my TalkTalk router address, 192.168.1.1 and I hit the login screen then, the Summary screen and I selet advanced and hit ok. Then I select Basic, then WAN, now there are three WAN Connection names in a small table:
Name Connection Type Connection Status IP Address Enable
nas_0_38 PPPoA Connected 79.XX.XX.XX 1
nas_0_65 Bridge Connected 1
ttyUSB0. PPP Pending Disconnect 1
Each one has a setting that can be adjusted, please could you provide instructions for this bit.
Thanks
Hi James,
I’ve just read your problem and I’m a bit confused. From the sounds of it, you’re trying to connect your Cisco router through a TalkTalk ADSL router? If that’s the case, then this config isn’t going to work.
Drop me an email at callam@callammcmillan.com and I’ll try and give you a hand if you’re interested.
C
Hello, I did email you just after I posted the last message and I got message sent failure back about 10 minutes later. Ill try again, please email me, I know email can be funny sometimes.
Thanks
James
James,
I’ve replied to your email. We’ll continue this conversation in private.
Callam
another option rather than a load of acl’s is to run a zone based firewall if your ios version supports it
Gordon, you’re absolutely right, and if you’ve done CCNA Security and know what you’re doing, then I would fully encourage you to do that.
Sadly, I haven’t done any Cisco certs, and this is the only way I know how to do it (as I am sure applies to 90%+ of people that read this article.) Every time I have tried building a zone based firewall, I always find stuff like asynchronous Javascript stops working.
found this blog REALLY useful. so i thought i’d chip in
and offer my ZBF config for anyone wanting to have a go
i have three zones. Inside, Outside and the Self zone
first we define an acl for traffic from-to each combination as below
ip access-list extended Inside-Outside-Inspect-ACL
remark permit LAN clients to the internet
permit ip 172.30.10.0 0.0.0.255 any
ip access-list extended Inside-Self-Inspect-ACL
remark LAN clients administering the router through ssh
permit tcp 172.30.10.0 0.0.0.255 host 172.30.10.1 eq 22
ip access-list extended Inside-Self-Pass-ACL
remark stateless DHCP requests from LAN clients
permit udp any any eq bootps
ip access-list extended Outside-Inside-Inspect-ACL
remark remote access VPN clients to matthew ssh
permit tcp 172.30.11.0 0.0.0.255 host 172.30.10.10 eq 22
remark remote access VPN clients to matthew rdp
permit tcp 172.30.11.0 0.0.0.255 host 172.30.10.10 eq 3389
remark remote access VPN clients to matthew vnc
permit tcp 172.30.11.0 0.0.0.255 host 172.30.10.10 eq 5900
ip access-list extended Outside-Self-Inspect-ACL
remark remote access VPN clients phase one traffic
permit udp any any eq isakmp
remark remote access VPN clients phase two traffic (NAT-T)
permit udp any any eq non500-isakmp
remark remote access VPN clients phase two traffic
permit esp any any
remark remote access VPN clients administering the router through ssh
permit tcp 172.30.11.0 0.0.0.255 host 172.30.10.1 eq 22
ip access-list extended Self-Inside-Inspect-ACL
remark allow ICMP from router to LAN clients for DHCP check
permit icmp host 172.30.10.1 172.30.10.0 0.0.0.255 echo
ip access-list extended Self-Inside-Pass-ACL
remark stateless DHCP responses to LAN clients
permit udp any eq bootps any
ip access-list extended Self-Outside-Inspect-ACL
remark NTP requests to configured server
permit udp any host 82.219.4.30 eq ntp
remark NTP requests to configured server
permit udp any host 178.79.160.57 eq ntp
remark NTP requests to configured server
permit udp any host 193.62.22.74 eq ntp
remark NTP requests to configured server
permit udp any host 193.62.22.82 eq ntp
remark NTP requests to configured server
permit udp any host 193.62.22.90 eq ntp
remark NTP requests to configured server
permit udp any host 193.62.22.98 eq ntp
remark remote access VPN clients phase one traffic
permit udp any eq isakmp any
remark remote access VPN clients phase two traffic (NAT-T)
permit udp any eq non500-isakmp any
remark remote access VPN clients phase two traffic
permit esp any any
then create a class-map which references each acl
make them all inspect type
class-map type inspect match-any Inside-Self-Inspect-Class
match access-group name Inside-Self-Inspect-ACL
class-map type inspect match-any Self-Inside-Inspect-Class
match access-group name Self-Inside-Inspect-ACL
class-map type inspect match-any Inside-Self-Pass-Class
match access-group name Inside-Self-Pass-ACL
class-map type inspect match-any Self-Inside-Pass-Class
match access-group name Self-Inside-Pass-ACL
class-map type inspect match-any Inside-Outside-Inspect-Class
match access-group name Inside-Outside-Inspect-ACL
class-map type inspect match-any Outside-Inside-Inspect-Class
match access-group name Outside-Inside-Inspect-ACL
class-map type inspect match-any Self-Outside-Inspect-Class
match access-group name Self-Outside-Inspect-ACL
class-map type inspect match-any Outside-Self-Inspect-Class
match access-group name Outside-Self-Inspect-ACL
then create a poicymap for each zone combination and reference the class-maps
just be careful when configuring the pass class-maps as dhcp won’t work if you get this wrong
apply the pass classes first in each applicable policy and set the section to pass
followed by inspect classes and default drop
policy-map type inspect Inside-Outside-PolicyMap
class type inspect Inside-Outside-Inspect-Class
inspect
class class-default
drop log
policy-map type inspect Outside-Inside-PolicyMap
class type inspect Outside-Inside-Inspect-Class
inspect
class class-default
drop log
policy-map type inspect Self-Outside-PolicyMap
class type inspect Self-Outside-Inspect-Class
inspect
class class-default
drop log
policy-map type inspect Outside-Self-PolicyMap
class type inspect Outside-Self-Inspect-Class
inspect
class class-default
drop log
policy-map type inspect Inside-Self-PolicyMap
class type inspect Inside-Self-Pass-Class
pass
class type inspect Inside-Self-Inspect-Class
inspect
class class-default
drop log
policy-map type inspect Self-Inside-PolicyMap
class type inspect Self-Inside-Pass-Class
pass
class type inspect Self-Inside-Inspect-Class
inspect
class class-default
drop log
declare your zones
you don’t have to declare self as it’s built in
zone security Outside
zone security Inside
then define which policy-map is dealing with each zone combination
zone-pair security Inside-Outside source Inside destination Outside
service-policy type inspect Inside-Outside-PolicyMap
zone-pair security Outside-Inside source Outside destination Inside
service-policy type inspect Outside-Inside-PolicyMap
zone-pair security Outside-Self source Outside destination self
service-policy type inspect Outside-Self-PolicyMap
zone-pair security Self-Outside source self destination Outside
service-policy type inspect Self-Outside-PolicyMap
zone-pair security Inside-Self source Inside destination self
service-policy type inspect Inside-Self-PolicyMap
zone-pair security Self-Inside source self destination Inside
service-policy type inspect Self-Inside-PolicyMap
finally, declare which interfaces are in which zone
i’m using an 871w so i added the dialer to the Outside zone
and the BVI to the Inside zone
interface Dialer1
ip address negotiated
no ip unreachables
ip mtu 1492
ip nat outside
ip virtual-reassembly in
zone-member security Outside
encapsulation ppp
dialer pool 1
ppp authentication chap callin
ppp chap hostname *************
ppp chap password 7 *************
crypto map VPN
!
interface BVI1
ip address 172.30.10.1 255.255.255.0
ip nat inside
ip virtual-reassembly in
zone-member security Inside
ip tcp adjust-mss 1350
hope this helps
Hi,
Did you have any luck on getting this to work with TalkTalk?
I was previously on BT Infinity and my 887VA worked fine, TalkTalk doesn’t seem to want to play 🙁
Hi there,
i found your post very interesting and having a 2811 handy i’m thinking of giving this a go, what would be an acceptable ios to use on the 2811 for security and compatibility with connecting to the BT modem, at the moment it has 12.4.24.
I too are with plus-net and i’m finding their router to be a pain and often thought of hooking up a cisco to do the job properly..
regards fran
Hi Fran,
12.4.24 should be an acceptable operating system for getting online. It’s a bit dated now, but if that’s all you have access to, then go for it.
From there, and depending on your prior experience, start small and build up what you ask of the router over time.
Feel free to ask for more help here, and let us know how you got on.
Cheers,
Callam
Callum
We are trying to get an ASA 5505 working connected to an ECI BT VDSL modem. The ASA is doing the PPPoE authentication but the speeds are lower than expected – only 5-8Mbits up/dn.
I think it is to do with duplex MTU and MSS settings but as we can’t access the ECI modem we can’t check and the ISP is relucctant to ask BT!?
I have tried different duplex and MTU sizes but the MSS has always been 1380. The MTU is currently 1490. These seemed to give the best performance as much as possible. We know the line is capable of going as high at 40Mbit dn.
Advice appreciated
Alan
Hi Callum,
Thanks for uploading such a gr8 guide for configuring the router with BT infinity connection.
Question:
we got the BT connection with 8 static ip addresses. With the above configurations i am able to connect and access internet and also able to connect with other sites using DMVPN. But i am not able to utilize the static ip addresses – i have created the NAT rules and assigned public ip to internal ips and also created respective ACL for outside too, but i am unable to connect to any of them from outside.
Can you please put some light on it in case we need to perform few more things in case we want to use the ip range assigned to us.
best wishes.
Hey there great blog! Does running a blog like this require a large amount of work?
I’ve very little knowledge of programming however I had been hoping to start
my own blog soon. Anyway, if you have any suggestions or tips for new blog owners please share.
I know this is off subject however I simply needed to ask.
Kudos!
You might demand a new modem and buy a hub that is new.
I highly recommend the Netgear WNDR4300 – excellent range/velocity and most significantly may have DD-WRT installed.
Research ddwrt, in case you do wind up getting any
new router/device. It is a far more flexible (and lets me handle me and my 4 room mates links manner better than default option applications).
Interesting. I’ve always been aware of the DD-WRT suite, but have never actually used it. At the moment I’m playing with the pfSense software, which turns ordinary x86/x64 hardware into a high power router. My concern with things such as DD-WRT are that while the software may be good, you have to flash it to mediocre hardware. Plus, if you buy it new, you’re likely to void your warranty.
Great post, helped a lot to sort out my 867, a bit more complicated because I had to configure a VLAN for the internal network and not a dedicated adapter but this post got me on the right path.
Just for info, I’ve been having all sorts of fun with MTUs on my PlusNet PPPoE broadband. I had the “ip tcp adjust-mss” commands you’ve listed above on my VLAN and the Gigabyte adapter that was bound to the dialar and this would cause sound clipping on YouTube videos. If I removed “ip tcp adjust-mss” from all but the dialer interface then YouTube would work but I’d have issues with other services. The compromise I got to work was just have the “ip tcp adjust-mss” command on the VLAN and that works perfectly. It been a very long time since I used Cisco (think dial-up and 64k leased lines).
For info this was my final configuration.
interface GigabitEthernet1
description INTERNET
no ip address
ip access-group 101 in
duplex auto
speed auto
pppoe-client dial-pool-number 1
!
interface Vlan100
ip address 192.168.254.254 255.255.255.0
ip nat inside
ip virtual-reassembly in
ip tcp adjust-mss 1452
!
interface Dialer1
ip address negotiated
no ip unreachables
ip mtu 1492
ip nat outside
ip virtual-reassembly in
encapsulation ppp
dialer pool 1
ppp chap hostname user@name.com
ppp chap password 7 password
ppp pap sent-username user@name.com
no cdp enable
Hopefully this’ll help someone else in the future.
Thanks again
Rob
A great read – I posted something very similar on the BT Community care forums a few years ago where I worked with Cisco TAC to address the throughput and DNS / loading issues (and where the MSS came up).
I’ve just moved onto FTTP with a 1941 router and getting disappointing results.
Throughput on the BT Hub 6 (cabled) is in the region of 204mb/sec which is fantastic.
When using a combination of this and the minijumbo frames (1500/1508 byte) config, I’m peaking out at approx 96mb/sec…!
Any ideas?
interface Gig0/0
description DATA-LAN
ip address xx.xx.xx.xx 255.255.255.0
ip accounting output-packets
mtu 1500
ip flow ingress
ip nat inside
duplex auto
speed auto
!
interface Gig0/1
description ONT FTTP
ip address dhcp
ip accounting output-packets
ip flow egress
ip nat outside
no ip virtual-reassembly
mtu 1508
duplex auto
speed auto
pppoe enable group global
pppoe-client ppp-max-payload 1500
pppoe-client dial-pool-number 1
no routing dynamic
!
interface Dialer1
description WAN-Dialer
ip address negotiated
ip flow ingress
ip nat outside
no ip virtual-reassembly
encapsulation ppp
dialer pool 1
no cdp enable
ppp chap hostname bthomehub@btbroadband.com
ppp chap password 0 bthomehub@btbroadband.com
ppp pap sent-username bthomehub@btbroadband.com password 0 bthomehub@btbroadband.com
!
ip route 0.0.0.0 0.0.0.0 Dialer1
!
ip nat inside source list 199 interface Dialer1 overload
access-list 199 permit ip xx.xx.xx.xx 0.0.0.255 an
Interfaces coming up at Gig/Full and showing the correct MTU. I can ping out with large sized packets (non fragmented). Very odd!
All other infrastructure remains in place (3750X switches, AP’s and controllers) to discount those from being the issue with the BT Hub 6.
Hi Lee,
I’m afraid this is a little beyond my capability to diagnose, but hopefully one of the readers may be able to share a solution with you.
Callam
Flat out, the 1941 will do approx 150Mbps, without any processing according to Cisco. Your running NAT, NBAR will impact on that. HTH
Adrian,
That’s a useful reply, thank you. Is there any chance you can share the link to the routing speeds of the newer routers? My one is a few years out of date now.
Callam
Just wanted to say a big “Thanks”!
I used this guide in conjunction with your ADSL over POTS config to get a 881W-K9 router working with an open reach modem (with modded firmware to accept the ADSL line instead of VDSL)
I’m studying for my CCENT/CCNA and this was a great project to practice what I’d learned.
Hi Callam,
Firstly, thanks for taking the time to write this up. I have a cisco 887 with built in VDSL modem and was abole to use some of this config to get me running.
I have a question regarding access list 101. Why do yo block all private IP addresses? I haven’t got much of an access list on my setup and am curious as to whether this is an entry point for an attack? I didn’t think you would be able to receive any traffic from private IP’s. Also, I’ve always been under the illusion that NAT gives a degree of protection as any random packets would be dropped unless the port is specifically forwarded.
I am not a Cisco expert, just studying for my CCNA. So these may be daft questions, but I’m interested to hear your thoughts.
I’d just like to say thank you ever so much!
You’ve helped me along the way getting my Cisco 1912 setup with my EE fiber line. Been playing around with it for the last few days but this has been a gem of a guide!
Just wanted to say thanks.
i am from Italy hello. Can you help me translate? /rardor
I couldn’t refrain from commenting. Well written!